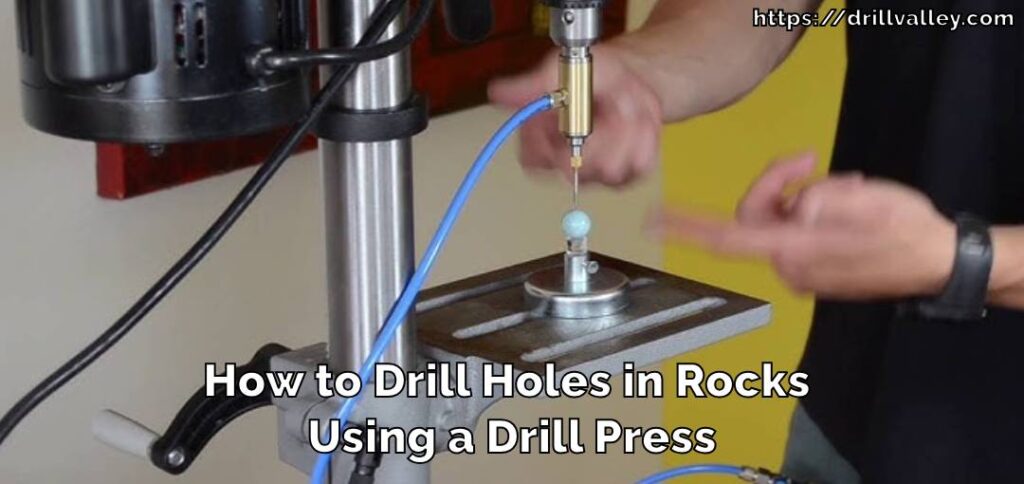
How to Drill Holes in Rocks Using a Drill Press
It is not only professional rock makers who drill holes in rocks. Anybody can do so using proper tools and a few tips to consider. By drilling a hole in a stone you can make either jewelry, garden decorations, or use stones for other purposes.
When used for this purpose, mastering the procedure of using a drilling machine could bring about fresh ways of being creative. Here is How to Drill Holes in Rocks Using a Drill Press without compromising safety or accuracy.
Tools Needed for Drilling Holes in Rocks Using a Drill Press
- Drill Press: The cornerstone tool for precision and stability.
- Masonry Drill Bits: Diamond drill bits are ideal, specifically designed to cut through stone.
- Clamp or Vise: To hold the rock steady during drilling.
- Safety Gear: Protective eyewear and gloves are essential.
- Water: For lubrication and cooling, a bit of water will do wonders.
- Collection Tray: To manage water and debris.
How to Drill Holes in Rocks Using a Drill Press
With the right tools and techniques, it’s something you can do yourself using a drill press. Here’s how to get started.
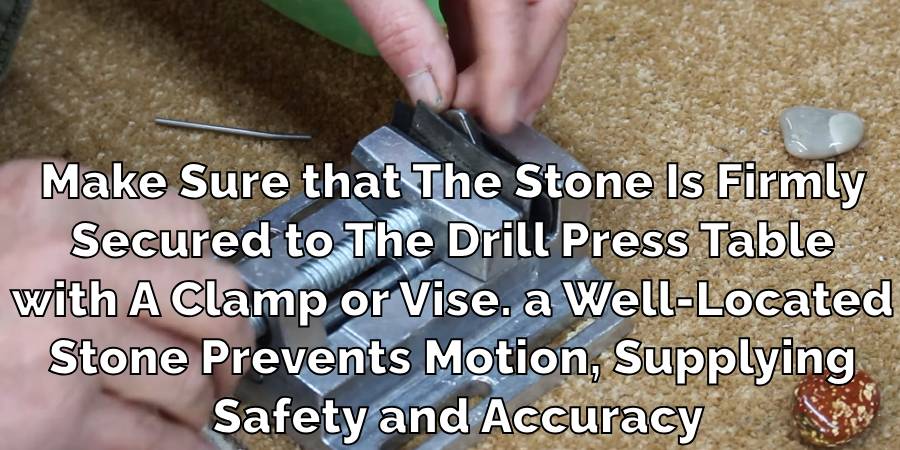
Secure the stone
First, make sure that the stone is firmly secured to the drill press table with a clamp or vise. A well-located stone prevents motion, supplying safety and accuracy.
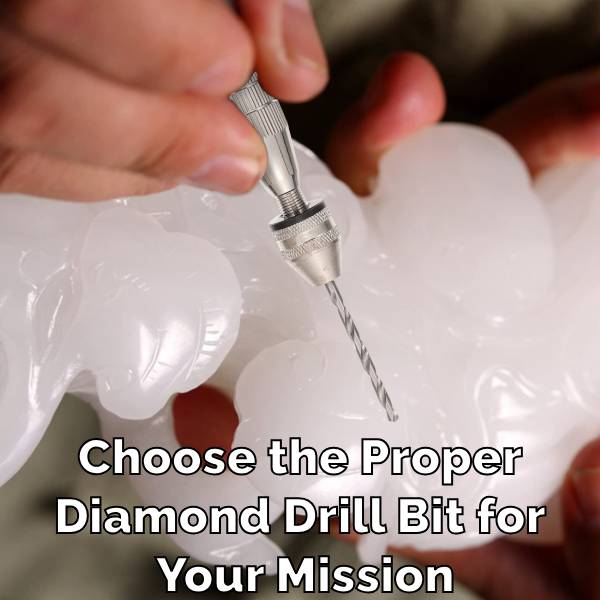
Select the Appropriate Drill Bit
Choose the proper diamond drill bit for your mission. The drill bit should be sized to healthy the favored hollow length, the use of a diamond bit makes the task less difficult and forestalls damage.
Repair the Drill Press adjustment
Set the drill press to the right velocity depending on the hardness of the rock. Soft rocks can be mined at high speeds, whilst tough rocks require slower speeds.
Start digging down
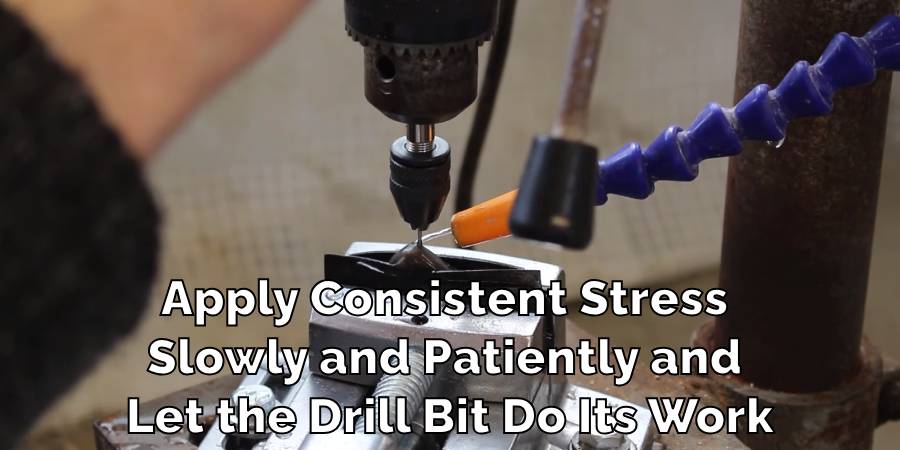
To drill a pilot hollow, begin at a mild speed, then boom the rate step by step. Apply consistent stress, slowly, and patiently, and let the drill bit do its work.
Sprinkle with water

Lubricate the drill bit and rock surfaces with a plastic container or craft foam dipped in water to lessen warmth and dirt.
Repeat as vital
Remove the drill bit periodically to easy particles and rehydrate. This continues the bit jogging easily and maintains lubrication and cooling.
With some patience and the right approach, drilling holes in rocks isn’t as hard as it seems. Just remember to stay safe, take your time, and use the right tools for the job.
Material Specific Guidelines
When drilling into rocks, it is crucial to recognize that distinctive rocks require extraordinary strategies. soft rocks like sandstone need a slower drill speed and much less stress to keep away from breakage. tough rocks like granite require a quicker drill speed and extra pressure, using diamond-tipped or carbide bits for great outcomes.
constantly use water to keep the drill bit cool and reduce dirt, irrespective of the rock type. recognize the material you’re operating with to drill effectively and correctly without damaging your tools or the rock.
Precautions While Drilling
- Wear Protective Gear: Always use safety glasses and sturdy gloves.
- Secure the Rock: Firmly attach the rock to the drill press table using a clamp or vise.
- Use Water Wisely: Apply water to cool the drill bit and reduce dust, avoiding electrical hazards.
- Be Patient: Rushing can lead to broken drill bits or damaged rocks. Take your time for effective and safe drilling.
By incorporating these techniques and using the correct equipment, such as diamond bits, a flex shaft for intricate work, or a standard drill for simpler projects, drilling holes in stones becomes an accessible craft.
Whether you’re working with a hand-powered drill, a corded drill for continuous power, or utilizing a drill press setup for maximum stability, understanding the correct drill bit size, the importance of a pilot hole, and the method to drill deep or deeper holes efficiently can turn a piece of wood, stone, or even glass into a personalized piece of art.
Drill Bit Maintenance and Replacement
When it comes to maintaining your drill bits, keeping them clean and stored properly can really help extend their life. After each use, it’s a good idea to clean off any dust or debris that’s collected on the bit. This can be as simple as wiping them down with a cloth or using a brush for tougher grime.
Then, make sure to store your drill bits in a cool, dry place. If they come in a protective case or holder, use it. This prevents them from getting damaged by moisture or accidentally banging against other tools.
Knowing when it’s time to replace your drill bit is also key to successful drilling. Signs that your drill bit is getting dull include more difficulty drilling into materials that used to be easy, the bit slipping off the surface instead of biting into it, and excessive heat production.
A dull bit not only makes your job harder but can also be dangerous, as it requires more force to achieve the same result, increasing the risk of slipping or breaking. If you notice these signs, it’s time for a replacement to keep your drilling efficient and safe.
Troubleshooting Common Problems
Drill Bit Slipping on Rock Surface
- Cause: Blunt drill bit or insufficient pressure.
- Solution: Use a sharp drill bit suitable for the rock type and apply more steady pressure.
Rock Cracking or Breaking
- Cause: Too much pressure or drilling too quickly.
- Solution: Reduce pressure, slow down the drill speed, and ensure the rock is well stabilized.
No Progress Through the Rock
- Cause: Wrong type of drill bit or a dull bit; incorrect drill speed.
- Solution: Switch to a more suitable or new drill bit and adjust the drill speed for better efficiency.
General Advice
- Patience is crucial. Take time to prepare, select the right tools, and make necessary adjustments during the process.
Environmental Considerations
When it comes to drilling, especially in activities like rock drilling, it’s important to think about how we can do it in a way that’s kinder to our environment. One way to be more sustainable is by being mindful of how much water we use.
Water is often used to cool down drill bits and reduce dust, but it’s crucial to use only what we need. You can do this by setting up a system that recycles the water used during drilling. This means the water can cool the drill bit multiple times, reducing the total amount used.
Another important point is what we do with the rock fragments that are left over after drilling. These pieces can pile up, but instead of seeing them as waste, we can find them a new purpose. For instance, smaller rock fragments can be used in landscaping, adding a natural touch to gardens and outdoor spaces.
They can also be ground down into gravel for pathways or even incorporated into concrete for construction projects. Larger pieces might be shaped into decorative items or used in building stone walls and other structures.
By taking these steps, we not only reduce the impact of our drilling activities on the planet but also give new life to materials that would otherwise be discarded. This way, we’re not just taking from the earth; we’re also giving back, repurposing what we use, and contributing to a cycle that’s more in harmony with the environment.
Project Ideas
Here’s how you can transform these natural treasures into artistic and functional pieces:
- Homemade Jewelry: Drilled rocks can be transformed into unique jewelry pieces. By drilling small holes into pebbles or slices of agate and other attractive stones, you can make pendants, earrings, or bracelets. This is a great way to create personal gifts or start a hobby that could turn into a small business.
- Garden Decorations: Use drilled rocks to add a special touch to your garden. You can string them together to make decorative chains that hang from tree branches or create a rock chime by hanging them at different lengths. Another idea is to place larger drilled stones around the garden as pathway markers or as part of a rock garden feature.
- Unique Home Décor Pieces: Drilled rocks can also be incorporated into home décor. For example, you could create a curtain or room divider with hanging rocks, or use them as part of a tabletop display. Larger rocks with holes can serve as candle holders or bases for light fixtures, adding a natural and rustic touch to your home.
- Aquarium Decorations: For those who keep fish or aquatic pets, drilled rocks can be used to create interesting and safe underwater landscapes. By stacking and arranging rocks with holes, you can provide hiding spots for fish and add to the aesthetic appeal of your aquarium.
- Outdoor Lighting: Combine drilled rocks with solar lights to create a charming outdoor lighting solution. By inserting small solar lights into holes drilled in larger rocks, you can light up a garden path, or driveway, or add ambient lighting to your outdoor seating area.
These projects not only recycle and repurpose natural materials but also add a personal touch to your surroundings, showcasing your creativity and respect for nature.
Advanced Techniques
For those looking to take their rock drilling to the next level, here are some techniques to consider:
- Drilling Larger Holes: To drill larger holes in rocks, you’ll need a core drill bit, which is designed to remove a cylinder of material. The process requires a steady hand and patience, as applying too much pressure can break the bit or the rock. Start slowly, and use water to keep the bit cool. This technique is perfect for creating candle holders or decorative features where larger voids are desired.
- Smoothing and Finishing Edges: After drilling, the edges of the holes in rocks can be sharp or rough. Smoothing these out will give your project a more polished look. Use sandpaper or a rotary tool with a grinding attachment to gently smooth the edges. Starting with a coarser grit and moving to a finer grit will create a smooth finish. This is essential for jewelry or any project where the rock will come into contact with the skin.
- Creating Complex Shapes with Multiple Drilling Angles: For more intricate designs, you may need to drill holes from multiple angles or create interconnected tunnels within the rock. This requires careful planning and marking the rock before you start drilling. Using a flexible shaft attachment for your drill can help you achieve the precision needed for these complex shapes. This technique can be used to create intricate sculptures, functional art pieces, or unique garden decorations.
Mastering these advanced techniques will enhance the quality and range of your work. Remember, each rock is unique, so take your time to understand its properties and how best to work with it.
Conclusion
Drilling holes in rocks opens a realm of possibilities for creative expression and practical applications. By following these steps and precautions, you can safely and effectively use a drill press to add a unique touch to rocks.
Remember, the key to success lies in preparation, patience, and respect for the tools and materials. As you gain experience, you’ll find drilling in rocks not just a task, but a doorway to endless creativity and customization.
You may also read – How to Drill Fiberglass without Cracking
Can You Use Impact Driver Bits in A Drill
Knowing whether you can swap impact driver bits into a regular drill matters more than…

Can You Drill Into Popcorn Ceiling
Wondering Can You Drill Into Popcorn Ceiling for your next home improvement project? Popcorn ceilings,…
Can You Drill Into Walls in A Rental?
Renting an apartment brings the challenge of personalizing your space within the confines of rules…
Can I Use a 1/4 Drill Bit Instead of 7/32
When you’re elbows deep in a project and suddenly realize the 7/32 drill bit you…
Can You Drill Concrete Without A Hammer Drill
Drilling into concrete requires both precision and the right tools, notably a hammer drill and…
Can You Use Different Brand Drill Bits?
The right drill bit size is crucial for any project, big or small. It’s the…